Get Paid To Promote, Get Paid To Popup, Get Paid Display Banner
Showing posts with label recipe. Show all posts

Saturday, August 20, 2011

Melon Salsa

I threw this recipe together quickly for my "A Muse Schmooze" get-together with the Longmontinas.

The group is designed to push each other to finish started projects (from knitting to novel-writing). Mostly we just  drink wine, eat cheese and make sarcastic jokes. So awesome.

Anyway...Melon Salsa!

Cantaloupes were practically being given away at Safeway today, so I picked some up and improvised something that would be bright and summery to celebrate summer's almost end.


What you'll need:
~1/2 Cantaloupe
~1 red onion
~1 small cucumber
~2 roma tomato (firm)
~1 bunch of cilantro
~2 serrano peppers
~juice of 2 limes
~1 can of  black beans, drained and washed
~Salt to taste

Dice everything (except the beans). Toss with  beans, lime juice and salt and refrigerate a few hours (to let the lime seep in).

Serve with blue corn chips. Should go well with a Mexican beer or an apple-y Chardonnay.

Makes two party-dip-bowl-sized servings.

Thursday, October 28, 2010

Pizza A La Checca


Being originally from New York, rarely a day passes that I don’t day dream about real NY pizza and bagels. You know, they say that it’s the NYC water that makes these things the phenomena that they are, and that they can't be duplicated in other cities because of it.

A few pizzerias in Los Angeles were rumored to import water from Manhattan to make their dough. Actually, some of the best pizza I’ve ever had outside of NY was in LA – at “Two Guys From Italy”, in Glendale. Man they really knew what they were doing.

In addition to an awesome Mexican pizza; chorizo, jalapenos, cilantro, red onions (jeez, I'm really hungry today), they’re the ones that first introduced me to my favorite pizza configuration; what they named “Pizza A La Checca”.

Alla Checca sauce is traditionally just a simple, uncooked sauce of diced roma tomatoes, fresh basil, mozzarella and garlic.

Here’s how The Two Guys made they’re pizza version (in these photos I used my usual Chef Boyardee pizza kit for the dough and my pizza stones from Pampered Chef):

Pizza A La Checca

Pizza Dough
3 TB Extra virgin olive oil
4 cloves chopped garlic
10 whole leaves of basil (Italians consider chopping basil bad luck, so if you want smaller pieces you can tear it)
Palm full of toasted pine nuts
2 diced ripe roma tomatoes
Shredded mozzarella
Sliced Pepperoni (optional)

Make your pizza dough and spread onto your hot pizza stone (I bake my pizza stone for 15 minutes on 425) or greased pizza pan. 

Brush the dough liberally with olive oil (you won’t be using sauce, so this helps moisten it). Spread mozzarella. Add basil, garlic, tomatoes and pine nuts. 


I always add pepperoni, because I just need pepperoni grease on my pizza – but you can drizzle a bit more olive oil instead and keep the whole thing vegetarian.


Bake at 425 for 15 minutes.

We (of course) also had to make a traditional American sauced version for the buddy boys (but Marley does like pine nuts on his side too!).

Thursday, October 21, 2010

Bolognese and Béchamel Lasagne

This lasagne recipe is not just the most perfect lasagne, it may be the most perfect food (providing you’re not a vegetarian). This recipe is adapted from Marcella Hazan’s (from Essential Classic Italian Cooking). It is the one that my mother always uses, and the one that she taught me

The Bolognese sauce takes such a long time, and requires such attention, you will feel like you are doing something very special for your family and friends when you prepare this (it takes at least 3 hours). Having to create two different sauces for one dish leaves you feeling quite continental; you use béchamel in place of any cheese.

I’ve had more than one boyfriend persuade me into altering the recipe to closer resemble their own childhood lasagnes (adding mozzarella, ricotta, garlic, oregano, etc). And guess what? Not as good. Not even close. Because, simply stated, this dish is a masterpiece. You cannot tinker with a masterpiece. 

 
Bolognese Sauce
1 TB extra virgin olive oil
3 TB butter
1/2 cup chopped onion
2/3 cup chopped celery
2/3 cup chopped carrot
3/4 pound ground beef (not lean - higher fat content will make the sauce, or
ragù, sweeter)
1 cup whole milk
1/8 tsp grated nutmeg
1 cup dry white wine
1 1/2 C canned Italian plum tomatoes, cut in with their juice
salt
pepper
 
Put oil and butter in a large heavy pot with chopped onion over medium heat. Cook and stir onion until translucent. Add chopped celery and carrot. Cook for 2 minutes more, stirring the vegetables to coat them well.
 
Add ground beef, a large pinch of salt, and a few grindings of pepper. Break up the meat and stir well, cooking until the beef has lost its raw, red color.

Add the milk and let simmer gently, stirring frequently, until it has bubbled away completely. This can take a while. Add the 1/8 tsp of grated nutmeg and stir.

Add the wine and let simmer until it has evaporated. 

Add tomatoes and their juice and stir thoroughly to coat all ingredients. When the tomatoes begin to bubble, turn heat down so that the sauce cooks at the laziest simmer.

Cook uncovered for 2- 3 hours, stirring from time to time. I use a wooden spoon to break up the giant tomato pieces occasionally as the sauce cooks. 

Taste and correct for salt.

Béchamel Sauce
4 tablespoons butter
3 tablespoons all purpose flour
2 cups milk (heat in microwave 30 seconds)
1/4 tsp salt 

Melt the butter in a heavy bottomed saucepan, and turn the heat to low. When the butter has melted completely, add all the flour, whisking as you add. Cook, stirring constantly, for about 2 minutes. This is called a roux. As you draw the whisk across the bottom of the pan, if the roux is thick enough to expose the bottom for a second or two it’s ready for the next step. Don’t let the roux brown. Remove from the heat. 

Off heat, add 2 tablespoons of hot milk to the flour and butter mixture, and whisk until incorporated. Repeat this procedure until you have used 1/2 cup of milk. Continue to add milk, now at 1/2 cup at a time, thoroughly stirring until incorporated after each addition. (Or in Marcella's words: "Stirring steadfastly, until you have smoothly amalgamated all the milk with the butter and flour.") Adding the liquid off heat will help prevent lumps from forming. 

Return the pan to low heat, add the salt, and continue to stir without stopping until the sauce is as "dense as thick cream."  If you find any lumps, beat the sauce rapidly with a whisk.

Lasagne
1 box of lasagne noodles (or fresh noodles if you're really talented and fancy)
Bolognese
Béchamel
2 TB butter
freshly grated parmigiano-reggiano cheese

Preheat oven to 400.
Prepare lasagne noodles. 

Spoon some Bolognese off the top (where some oil is separated) and ladle into the bottom of your lasagne dish. Line the bottom of pan with one layer of noodles.

Cover the noodles with a layer of the Bolognese, then a bit of the béchamel on top of that (it will not cover the whole layer – just ladle a few stripes). Sprinkle some grated Parmesan, then add another layer of noodles. Repeat the procedure of spreading sauce and Parmesan and noodles. Leave enough B
échamel sauce to spread a thin layer on top at the end. Sprinkle with Parmesan and dot with butter. (This can be made up to 2 days in advance and refrigerated.) 

If you have Bolognese left over, freeze it (it’s great on all pasta, but is traditionally served with tagliatelle).

Bake lasagne on top rack until golden crust forms on top, about 10 or 15 minutes. Remove from oven and allow to cool for 10 min. before serving.

Tuesday, October 19, 2010

Slow Cooker Honey Orange Ribs

I hate when I look up slow cooker recipes and they involve all of this pre-cooking jazz (browning of the meat in a pan, pre-baking of ribs, etc). Worse yet I hate when you have to slow cook one part for an hour, then add other stuff, or cook for 6 hours, then add other stuff, or take out stuff or any other combination. The sole point of slow cooking (so far as I’m concerned) is that you throw stuff in a pot in the few minutes that you have before work, and then you come home cranky and hungry and – ta da! All done, just like magic.

This is one of those recipes. Its only flaw is that you have to make some mashed potatoes to go with it.

Ingredients
1 rack baby-back ribs (about 14 ribs each)
3/4 cup honey    
Juice of one orange (or 1/4 cup OJ)
1/2 cup ketchup
1/3 cup brown sugar
2 TB apple cider vinegar
1 TB maple syrup  
2 tsp Dijon style mustard    
1 TB Worcestershire sauce
1 TB soy sauce
1 TB chili powder
1 tsp paprika
1 tsp garlic powder
1 tsp salt

Cut the ribs apart for easier fitting (and maximum saucing). Place the ribs in the bottom of a slow cooker. In a big bowl, mix together the remaining ingredients.


Pour the mixture over the spareribs and stir well. Cover and cook on LOW for 6 to 8 hours.


Serve with mashed potatoes. Spoon the sauce over the potatoes like gravy.

Tuesday, October 12, 2010

Black Widow Berry Pie

This is my “Spooky Pie” entry for the pie contest blog You want Pies With That?.

Originally I wanted to do a “Four and Twenty Blackbirds Blackberry Pie”, but I just could not work out the logistics of the blackbirds. Instead I did a spider web over spooky blackberry filling.

Ingredients

Pie dough for top and bottom crust (I like to use Jiffy – it’s got cute retro artwork which makes me happy, and it always works perfectly– even at my high altitude)

5-6 cups blackberries, rinsed, picked clean, patted dry (if you use frozen berries, defrost and drain them)

1/2 cup to 3/4 cup sugar (depending on how sweet your berries are)

1 teaspoon lemon juice

1 teaspoon lemon zest

1/2 teaspoon ground cinnamon

1/4 teaspoon almond extract

3 Tbsp quick cooking instant tapioca (can usually find in the baking aisle of your local supermarket)

1 egg

Place blackberries, sugar, lemon zest, lemon juice, cinnamon, almond extract, and quick cooking instant tapioca in a large bowl. Gently fold the berries until they are all well coated with sugar. Let sit for 30 minutes.

Preheat oven to 400°F.

On floured board roll out half your dough in a circle for the bottom crust and line greased pie plate with it. Trim edges and crimp.
Pour filling into bottom crust.

Roll out the other half of the dough in an oblong shape to cut strips from. Use a pizza cutter to cut strips about 1/4 inch (I warbled and wiggled the cutter a little to create wavy and slightly creepier strips).
Beat the egg with a tablespoon of water for an egg wash (we’ll use it to stick the strips together).
Start with at least three long strips to create the base of the spider web (I think I should have used four or five….). Drape the tips over the edges of the crust (we’ll trim later).


Now, beginning in the center, cut strips to size so that they create a web shape. “Miter” the corners (like a frame), so the pieces don’t overlap.
For the best spider web effect, curve the strips a bit in towards the center as you go, if possible.

Wet the underside of the tips with the egg as you go, so they’ll stick.
Make a spiral (not concentric circles), all the way out to the outer crust. Add spider (mine’s not the best, so I’ll let you create your own). I should have put her in the center; I think it would have been much more dramatic.

Trim the excess strips from around the edges, and give all of the crust a good wash of egg with a pastry brush. Sprinkle a bit of sugar over the crust for a shimmery crust. Bake on the bottom rack 30 minutes (or until golden).

Serve with whipped cream or vanilla ice cream.


[CLICK TO ENLARGE AND PRINT] 

Thursday, October 7, 2010

Penne With Broccoli And Italian Sausage

As promised....a recipe with actual vegetables! This is adapted from a dish my mom made when I was younger. Some of us like broccoli, and some don't, which is why I used it as a garnish (just on half - like a pizza!).

Penne With Broccoli And Italian Sausage
1 lb fresh Italian sausage (sweet, mild or hot depending on preference)

   remove from casings if needed
4 cloves garlic
1 box Penne

1/8 cup Pine Nuts
1oz Sun Dried Tomatoes in Olive oil (2 or 3 pieces)
Pecorino Romano cheese
salt and pepper

extra virgin olive oil
couple of shakes red pepper flakes (optional)
1 TB butter (optional)

Bring a pot of salted water to boil. 


Toast the pine nuts in 350 degree oven for 5 minutes (watch them! they burn so easily).
Throw the whole head (with stem)of broccoli in the boiling water for 5 minutes - then remove to cutting board.

Heat 2 TB olive oil in a large skillet and crumble the sausage meat into the oil until it starts to brown. Slice the garlic thinly and add garlic and pepper flakes, sauteeing until all meat is brown and slightly crisp. 


Slice the sun dried tomatoes thinly and add with the pine nuts to sausage. Add a few more splashes of olive oil to be sure there will be enough to cover the pasta - I added a pat of butter at this point as well. Reduce to low heat and stir well.

Cook pasta as per box instructions and drain. Dice the broccoli (florets and stem). Use the pasta pot to combine the penne and the sausage mixture (coating each piece of penne well with oil), reserving a tiny bit of oil in the sausage pan. Throw the broccoli into the garlic-y oil and toss on low until warmed. Salt and pepper both - pasta and broccoli.


Pour pasta mixture into large mouthed bowl or wide deep dish and place the broccoli on top to one side. Top with a generous amount of shaved Pecorino Romano (serve with more at the table).


The penne takes on a great nutty flavor!


Tuesday, October 5, 2010

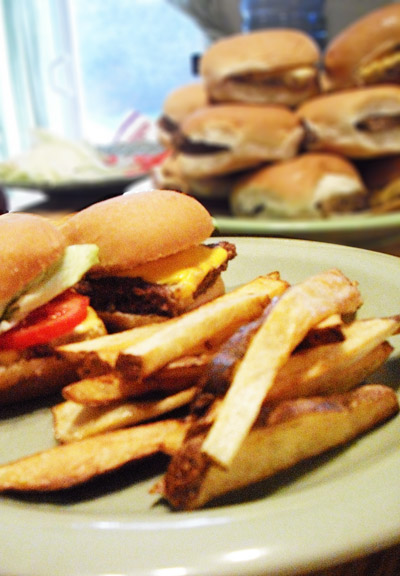
Sliders and Steak Fries

Let me preface this post with an explanation as to why I cook like a cross between a fifties housewife and a diner fry cook.

I’ve already mentioned that my mother is a gourmet cook (and freelance food writer). My ex-husband was a chef, who cooked for us most nights, and owned and ran his own restaurant for a while. These combined shadows gave me low cooking-confidence, and I rarely delved into anything more complicated than mac and cheese for many years, lest I be judged by the better cooks around me.

After my divorce three years ago, I felt unfettered enough to explore the kitchen on my own. With my two very young boys as my only customers, I developed a kid-friendly style that was rooted primarily in retro pop-culture, combined with what I learned working in my ex’s restaurant (which was California Café style).

Another heavy influence on my cooking style is The Food Network’s Sandra Lee. My older son (who wants to be a chef) and I love to watch her program “Semi-Homemade”. The name says it all.
She’s a QVC product queen (she invented Kraft Kurtains and 157 other items) whose Food Network bio states she “attended the world's leading culinary art institute, Le Cordon Bleu”.  [So what if it was the one in Ottowa? And if it was just a two week course she skipped out on half way through?] We like her and her 1950’s cooking style; reminiscent of the jam-packed lives of women experiencing the wonder of the dawn of the space age.

Her basic formula involves 70% store-bought, prepared foods (in cans, boxes, packets or frozen) with a sprinkling of 30% fresh from scratch ingredients. While I don’t touch cheez-wiz, or eat canned veggies, I do employ her methods to get that dinner out – every night, hot and complete, whether I have the energy, money or emotional where-with-all or not, and trying, somehow, to make it fun. Almost EVERY night we sit down, all together. Making that happen sometimes takes help, especially on work evenings.

This recipe is reminiscent of White Castle’s sliders. I promise I'll make something with vegetables next time.

I usually make my own slider buns, by baking a tray of white dinner rolls (from the frozen food section).
I happened upon a bunch of Pepperidge farm slider buns at the dollar bread store, so I bought them instead this time (but the fresh baked rolls are MUCH better).

Sliders
1 ½ pound ground beef
1 envelope onion soup mix
1 egg

Preheat oven to 400

Mix and pat into a 9 x 12 cookie tray. Meat should be about ¼ inch deep. Use a chop stick or straw to poke holes (a la White castle) into the meat every inch or so. Bake for 15 minutes. Take out and add cheese slices to top (the meat will shrink – but it will still be rectangular). 
Bake 5 minutes until cheese melts. Use a bit of math and a pizza cutter to slice equally sized burgers, about 2.5 inches square.

Place each on a bun and serve with sliced roma tomatoes, lettuce and pickle chips.
Makes 15 sliders.

Steak Fries
4 of the longest russet potatoes you can find in the bag
2 cups Cooking oil (I use canola, but safflower or
    vegetable is fine)
Popcorn salt

The secret to restaurant style fries is par-frying. It’s how you get the fries just golden and crisp on the outside, but perfectly cooked and soft on the inside.

Everyone in my house likes the skin on the fries so I don’t peel them (but you can if you wish). Cut your russet potatoes in the fry shape that you prefer. 

Pour enough oil into the pan so that it is about ¼ inch deep (deep enough for one fry to be almost covered).
Heat on medium heat.

Place the raw fries on one paper towel covered plate on the right side of the pan, and a second paper towel 
covered plate on the left. You’ll be doing these in batches.

When oil is heated, cover the bottom of the pan with one layer of raw fries. Fry for one minute (may need less time for the first batch). If even one fry begins to change to a gold color – take them all out right away! 
They should still look raw at this point. Transfer with slotted spoon to left hand plate. Repeat until all fries are par-fried.
 Replace oil to bring it back up to depth and heat up for a few minutes. 

Now cover the bottom of the pan with a layer of par-fried fries, and fry until all are golden all over (may have to turn a few). 
Remove to empty paper towel and salt immediately. Popcorn salt is finer than regular salt and will cover the hot fries better. Let oil heat between final few batches. 
Continue frying and salting until all are done. 

You can freeze leftover sliders (bun and all) - wrap two together in plastic wrap (no one ever wants just one). Once frozen microwave 1 - 2 minutes to heat.

Monday, September 27, 2010

Roasted Lemon Rosemary Chicken and Potatoes (plus Acorn Squash)


Despite the fact that the temperature here in Colorado has been in the eighties the past few days, I had a hankering for a full-on Autumn supper of roasted chicken and potatoes.

I always stuff my chicken with a punctured whole lemon before baking, for a juicy, flavorful bird, but Jamie Oliver had a great recipe which called for throwing the lemon in with the potatoes while par-boiling first.

The fact that he slapped bacon on the bird for added moistness was also genius.

I served this meal with my usual acorn squash last night and it was quite sublime; a hit with the kids as well.


Roasted Lemon Rosemary Chicken and Potatoes
3-4 lb chicken
Salt and freshly ground black pepper
4½ lb potatoes, peeled
1 large  or two small lemons
1 whole bulb of garlic, broken into cloves and peeled
Olive oil
fresh rosemary sprigs, leaves picked
6 strips of uncooked bacon

Rub the chicken inside and out with a generous amount of salt and freshly ground black pepper. Do this in the morning if possible, then cover the chicken and leave in the fridge until you're ready to start cooking it.

Preheat your oven to 375°F.

Bring a large pot of salted water to the boil. Quarter the potatoes and  put them into the boiling water with the whole lemon and the garlic cloves.


Parboil for 12 minutes. Drain and allow to steam dry for 1 minute (this will give you crispier potatoes).

Remove the lemon and garlic and set aside, and toss the potatoes into the roasting pan with a little olive oil and some rosemary leaves. Stirring the hot potatoes while still hot so they get a little scuffed will make them crisp up better while they roast.

Take the chicken out of the fridge, pat it dry and rub it all over with olive oil. 

While the lemon is still hot, carefully stab it about 10 times and put into the chicken cavity (this steams the chicken from the inside). 
Push the garlic cloves and more rosemary into the cavity, then put the chicken in the roasting dish on top of the potatoes (breast up).

Bake about 45 minutes.

Take the chicken out (its skin should be golden) and lay the raw slices of bacon over the chicken breast. Bake another hour, basting occasionally with the bacon-y juices.

Check the chicken for doneness once the bacon is crisp. You can tell the chicken is cooked when the thigh meat pulls easily away from the bone and the juices run clear. A meat thermometer should read about 170 degrees.

Remove the bacon from the chicken and crumble it over the potatoes. Carve the chicken and serve the hot lemons (halved) and the garlic as garnish (squeeze the juice over meat as you serve).

Serve with acorn squash. 

Baked Acorn Squash
2 acorn squash
4 Tb salted butter
4 Tb brown sugar
salt
cinnamon

Halve the squash and scoop out seeds (an ice cream scoop works best). Slice off a sliver from each pointy end so they sit up right.

Place in baking dish. Place 1 Tb butter, 1 Tb brown sugar, dash of salt and cinnamon in each half.

Bake in 375 oven for 1 hour. (I basted the edges with some of the chicken/ bacon juice as well towards the end).

Serves 4 as a side.


The adults had Pumpkin Lager (from Lakefront Brewery) which complimented the meal perfectly.


[CLICK TO ENLARGE AND PRINT]


Sunday, September 26, 2010

Cilantro Lime Hummus

Hummus is a great appetizer for “pop-in” entertaining. The supplies cost very little, it only takes a few minutes to make fresh and is suitable for vegetarians and vegans.

If you always make sure you have a can of garbanzo beans in the pantry and a jar of tahini (sesame paste) in the fridge, you’ll probably already have the rest of the ingredients around anyway,and you can make it on a moments notice.

This version has a bit of a Southwestern twist, with cilantro and lime.

Cilantro Lime Hummus
1 can chick peas (garbanzo beans)
2 Tbsp extra virgin olive oil    
Juice of one lime
Juice of one lemon
3 TB  Tahini (Sesame Paste; I could only find this at Whole Foods in Colorado -
     it was readily available in most markets in California.
    One jar will last a crazy long time)
1 big clove garlic    
1/2 tsp sea salt    
1/4 bunch of cilantro leaves
1/2 serrano pepper* (*Optional)
1/4 to 1/2 cup water as needed

Blend ingredients (in blender or food processor), adding water until desired consistency is reached (should be thickness of peanut butter).

Transfer to cute bowl and top with cilantro leaves and sea salt. Serve with pita chips, sliced baguette or fresh veggies (I like dipping fresh jalapenos or Serrano peppers). Goes well with wine or beer.

Wednesday, September 22, 2010

Kitchen Herbs - A Brown Thumb's Best Friend (Plus Pesto Recipe)


As I’ve stated before, I suck at gardening (despite my love of it). Sucking doesn’t stop me from spending lots of time doing it, but it does cause the death of lots and lots of my plant friends; I have a dead house fern on top of my china cabinet I keep forgetting to throw out. I need a step stool to get it down, but I just keep passing it, thinking “Poor fern”, and then forgetting….which is why it’s dead in the first place.
But just look at my kitchen herbs on the sill above my sink! Their health is a shining testament to the ease with which these guys can be grown. I guess because they’re right there – right above the faucet, they get drinks when no one else does.
I have two types of basil (one is a cinnamon basil with a great spicy scent to it), oregano, chives and…..something else. I’m just a terrible gardener. Could be a different type of oregano….
The pots are from the dollar store (the dollar store where everything is actually a dollar) and they’ve been doing a great job for almost two years. I use enough of the fresh herb cuttings for cooking that they don’t over run the place.
If you’ve never made pesto, you probably don’t know how ridiculously easy it is to make – you may never want to buy the overpriced, itty, bitty jar at the grocery store again......
Basil Pesto
4 cups packed fresh basil leaves
1/2 cup extra virgin olive oil
1/3 cup toasted pine nuts (I use a garlic roaster to toast nuts - in 350 oven until golden - watch them closely!)
3 cloves garlic
1/3 cup grated parmesan
1 tsp. salt
black pepper, to taste
In a blender or food processor, blend the basil, oil, nuts, and garlic until they make a thick paste.
Dump in the parmesan cheese and the salt. Blend.
Scoop pesto out into a bowl and stir in pepper to taste.
Serve immediately or cover surface of pesto in a fine layer of olive oil and store in the fridge up to five days in ajar or tupperware container. Makes one cup.

[CLICK TO ENLARGE AND PRINT]
Then you can make this Tomato Pesto Pizza (from Pillsbury).
Hey! You can’t make EVERYTHING from scratch!

Tomato Pesto Pizza
1 can (11 oz.) Pillsbury® refrigerated thin pizza crust
¼ cup basil pesto
2 large plum (Roma) tomatoes, chopped
1 cup shredded Italian cheese blend (4 oz.)
2 tablespoons fresh basil leaves, thinly sliced
Heat oven to 400°F. Unroll dough on olive oiled cookie sheet; starting at center, press dough into 15x10-inch rectangle OR preheat an oiled pizza stone, shape pizza with dough on cutting board or second sheet, then transfer to hot stone.
Spread pesto to within ½ inch of edges of dough. Top with tomatoes; sprinkle with cheese.
Bake 10 to 12 minutes or until crust edges are golden brown and cheese is melted. Sprinkle with basil (and maybe add pepperoni! I can’t eat pizza without pepperoni…..).
I also like to use (believe it or not) Chef Boyardee's "Pizza Kit". It's much faster than starting dough from scratch, and you can keep the kit in the pantry longer than the refrigerated Pillsbury dough. I also like the pizza sauce it comes with. Don't get the pepperoni kit, though, because there are weird little pepperoni pieces in the sauce ..... no one wants their pepperoni in the sauce. Ew.

Monday, August 30, 2010

Chicken Apple Cheddar Empanadas


This is the kind of recipe I reserve for Sunday dinner.I need one whole day to recuperate from a week of work/ school/ running kids around/ chore catch-up before I can tackle an hours-long cooking session.

The great thing about frozen puff pastry is that you look fancy, but you really didn’t do anything that was tricky. Plus, kids DIE for puff pastry. For some reason it’s like a treat even when filled with three food groups.


Ingredients:
2 medium chicken breasts cooked (grill, bake or sautee)
1 egg
1 package frozen puff pastry (contains 2 sheets)
2 diced granny smith apples*
1 diced red apple*
*(if you or your kids have a problem with cooked apple skins, peel first)
¼ cup minced red onion (optional/ can also substitute 3 minced garlic cloves)
1 ½ cups shredded extra sharp cheddar cheese
2 Tb butter
Salt/ Pepper
1 Tb lemon juice
Roll of parchment (optional)
Let puff pastry thaw (20-40 minutes. Preheat oven to 375.
Sautee chopped apples and onions in butter until onions are cooked and apples are just soft. Dice the chicken breast. Toss diced chicken, apples, onions and shredded cheddar in a bowl with salt and pepper to taste and a squeeze of lemon juice. Set aside on the counter to cool.
Place first puff pastry sheet on a lightly floured surface and roll out to about twice the size that it started out. Puff pastry is not like pie or pizza dough – you can’t lump it together and re-roll, or patch, so roll carefully.
Use a glass to cut out circles. Use your geometry skills and maximize the surface area (remember – you can’t collect the scraps at the end and re-roll – the pastry won’t “puff” the same). Try to get 12 circles, each 2.5 inches in diameter. You can give the kids the scraps to make weirdly shaped pastries or haphazardly filled versions. Mine always insist on making a “just cheese” version. Repeat with second sheet.
Traditionally empanadas are half moon shaped (you fill one side and fold over) but this filling is a little chunkier, and you need a certain ratio of the ingredients in each empanada to get the correct flavor, so I’m using one circle on top and one on bottom.
Place a heap of filling in the center of each circle (leaving ¼ inch pastry around the edge showing). Use your finger or a pastry brush to wet the edge with warm water and top with second circle. Crimp edge with a fork.
Place empanadas on a parchment covered baking sheet. I use parchment for everything, for guaranteed non-sticking and easy clean up. I especially like how puff pastry bakes on it. If you’re not using parchment, place on ungreased cookie sheet.
They’re going to puff up twice their size, so leave 3 inches between each on the pan.
Whisk the egg with a tablespoon of water (this is an “egg wash”, which makes puff pastry golden and shiny) and brush the tops of each empanada.
Bake for 15 minutes at 375, or until golden (in Colorado it takes twice as long). Let cool ten minutes, then serve with sour cream and Dijon (or any mustard or dipping sauce you like). These make good appetizers/ finger party food, but you can serve with a salad as a main dish as well.
Makes 12.
PRINT RECIPE [CLICK TO OPEN]